JOUR-J - UNITES 1st Special Service Brigade
|
||||||||||||||
|
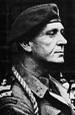
The 1st Special Service Brigade was a commando brigade of the British Army. Formed during the Second World War, it consisted of elements of the British Army and the Royal Marines. The brigade's component units saw action individually in Norway and the Dieppe Raid, before being combined under one commander for D-Day. The plan was for 1st Special Service Brigade comprising Nos 3, 4, 6 and 45 (RM) Commandos to land at Ouistreham. No 4 Commando were augmented by 1 and 8 Troops (both French) of No 10 (Inter Allied) Commando. The assault on Sword began at about 03:00 with an aerial bombardment of the German coastal defences and artillery sites. The naval bombardment began a few hours later. At 07:30, the first units reached the beach. The 1st Special Service Brigade, under the command of Brigadier Lord Lovat, were piped ashore in the second wave led by No 4 Commando with the two French Troops first, as agreed amongst themselves. The British and French personnel of No.4 Commando had separate targets in Ouistreham: the French, a blockhouse and the Casino; the British, two batteries overlooking the beach. Lord Lovat reputedly waded ashore wearing a white pullover under his battledress, with "Lovat" inscribed on the collar, while armed with an old Winchester rifle. He instructed his personal piper, Bill Millin, to play the commandos ashore, in defiance of specific orders not to allow such an action in battle. Lovat's forces pressed on, Lovat himself advancing with parts of his brigade from Sword to Pegasus Bridge, which had been obstinately defended by men of the British 6th Airborne Division who had landed in the early hours. The commandos arrived almost exactly on time, (late by about two minutes), for which Lord Lovat apologised to Lieutenant Colonel Richard Geoffrey Pine-Coffin, of 7th Parachute Battalion. |
||||||||||||||
  |
||||||||||||||
| Second-in-Command: Major John B. V. Pooley [voir le dossier] | ||||||||||||||
| Adjutant: Captain Wardle [voir le dossier] | ||||||||||||||
| Intelligence Officer: Lieutenant C.G.C. Rae [voir le dossier] | ||||||||||||||
| Signal Officer: Lieutenant Skelly [voir le dossier] | ||||||||||||||
| Liaison Officer: | ||||||||||||||
| Medical Officer: Captain E.L. Moore [voir le dossier] | ||||||||||||||
| Chaplain : Captain/Reverend C. Pritchard [voir le dossier] | ||||||||||||||
| Regimental Sergeant Major: | ||||||||||||||
| Second-in-Command: | ||||||||||||||
| Second-in-Command: Major Charles Courtenay Coade [voir le dossier] | ||||||||||||||
| Second-in-Command: Major W. N. Gray [voir le dossier] | ||||||||||||||
| Second-in-Command: | ||||||||||||||